RViz Plugin for CuRobo ROS
Overview
The RViz interface is provided by the curobo_rviz package. It provides a graphical interface for:
Interactive trajectory planning using 6-DOF interactive markers
Real-time trajectory visualization with ghost robot preview
Object management for adding collision obstacles
Parameter tuning without command-line tools
Debugging and testing robot motions
Status: The plugin currently serves as a debugging and development tool. While functional, some features are still under development toward becoming more user-friendly.
Installation
The RViz plugin is included when you install curobo_ros:
# If not already installed
cd ~/ros2_ws
colcon build --packages-select curobo_rviz curobo_ros
source install/setup.bash
Dependencies: Requires RViz2, curobo_ros, and curobo_msgs packages.
Launching the Interface
Basic Launch
The RViz interface is launched via the gen_traj.launch.py launch file:
ros2 launch curobo_ros gen_traj.launch.py
Launch with Specific Robot
ros2 launch curobo_ros gen_traj.launch.py robot_config_file:=path/to/robot.yml
Expected Startup Behavior
Initial Freeze: The interface will appear to freeze or be unresponsive for 5-30 seconds during startup. This is expected behavior while cuRobo:
Loads robot configuration
Initializes GPU kernels
Warms up motion planning algorithms
Creates collision checkers
Ready Indication: Once warmup completes, the interface becomes responsive and the robot model appears in RViz.
Initial Interface
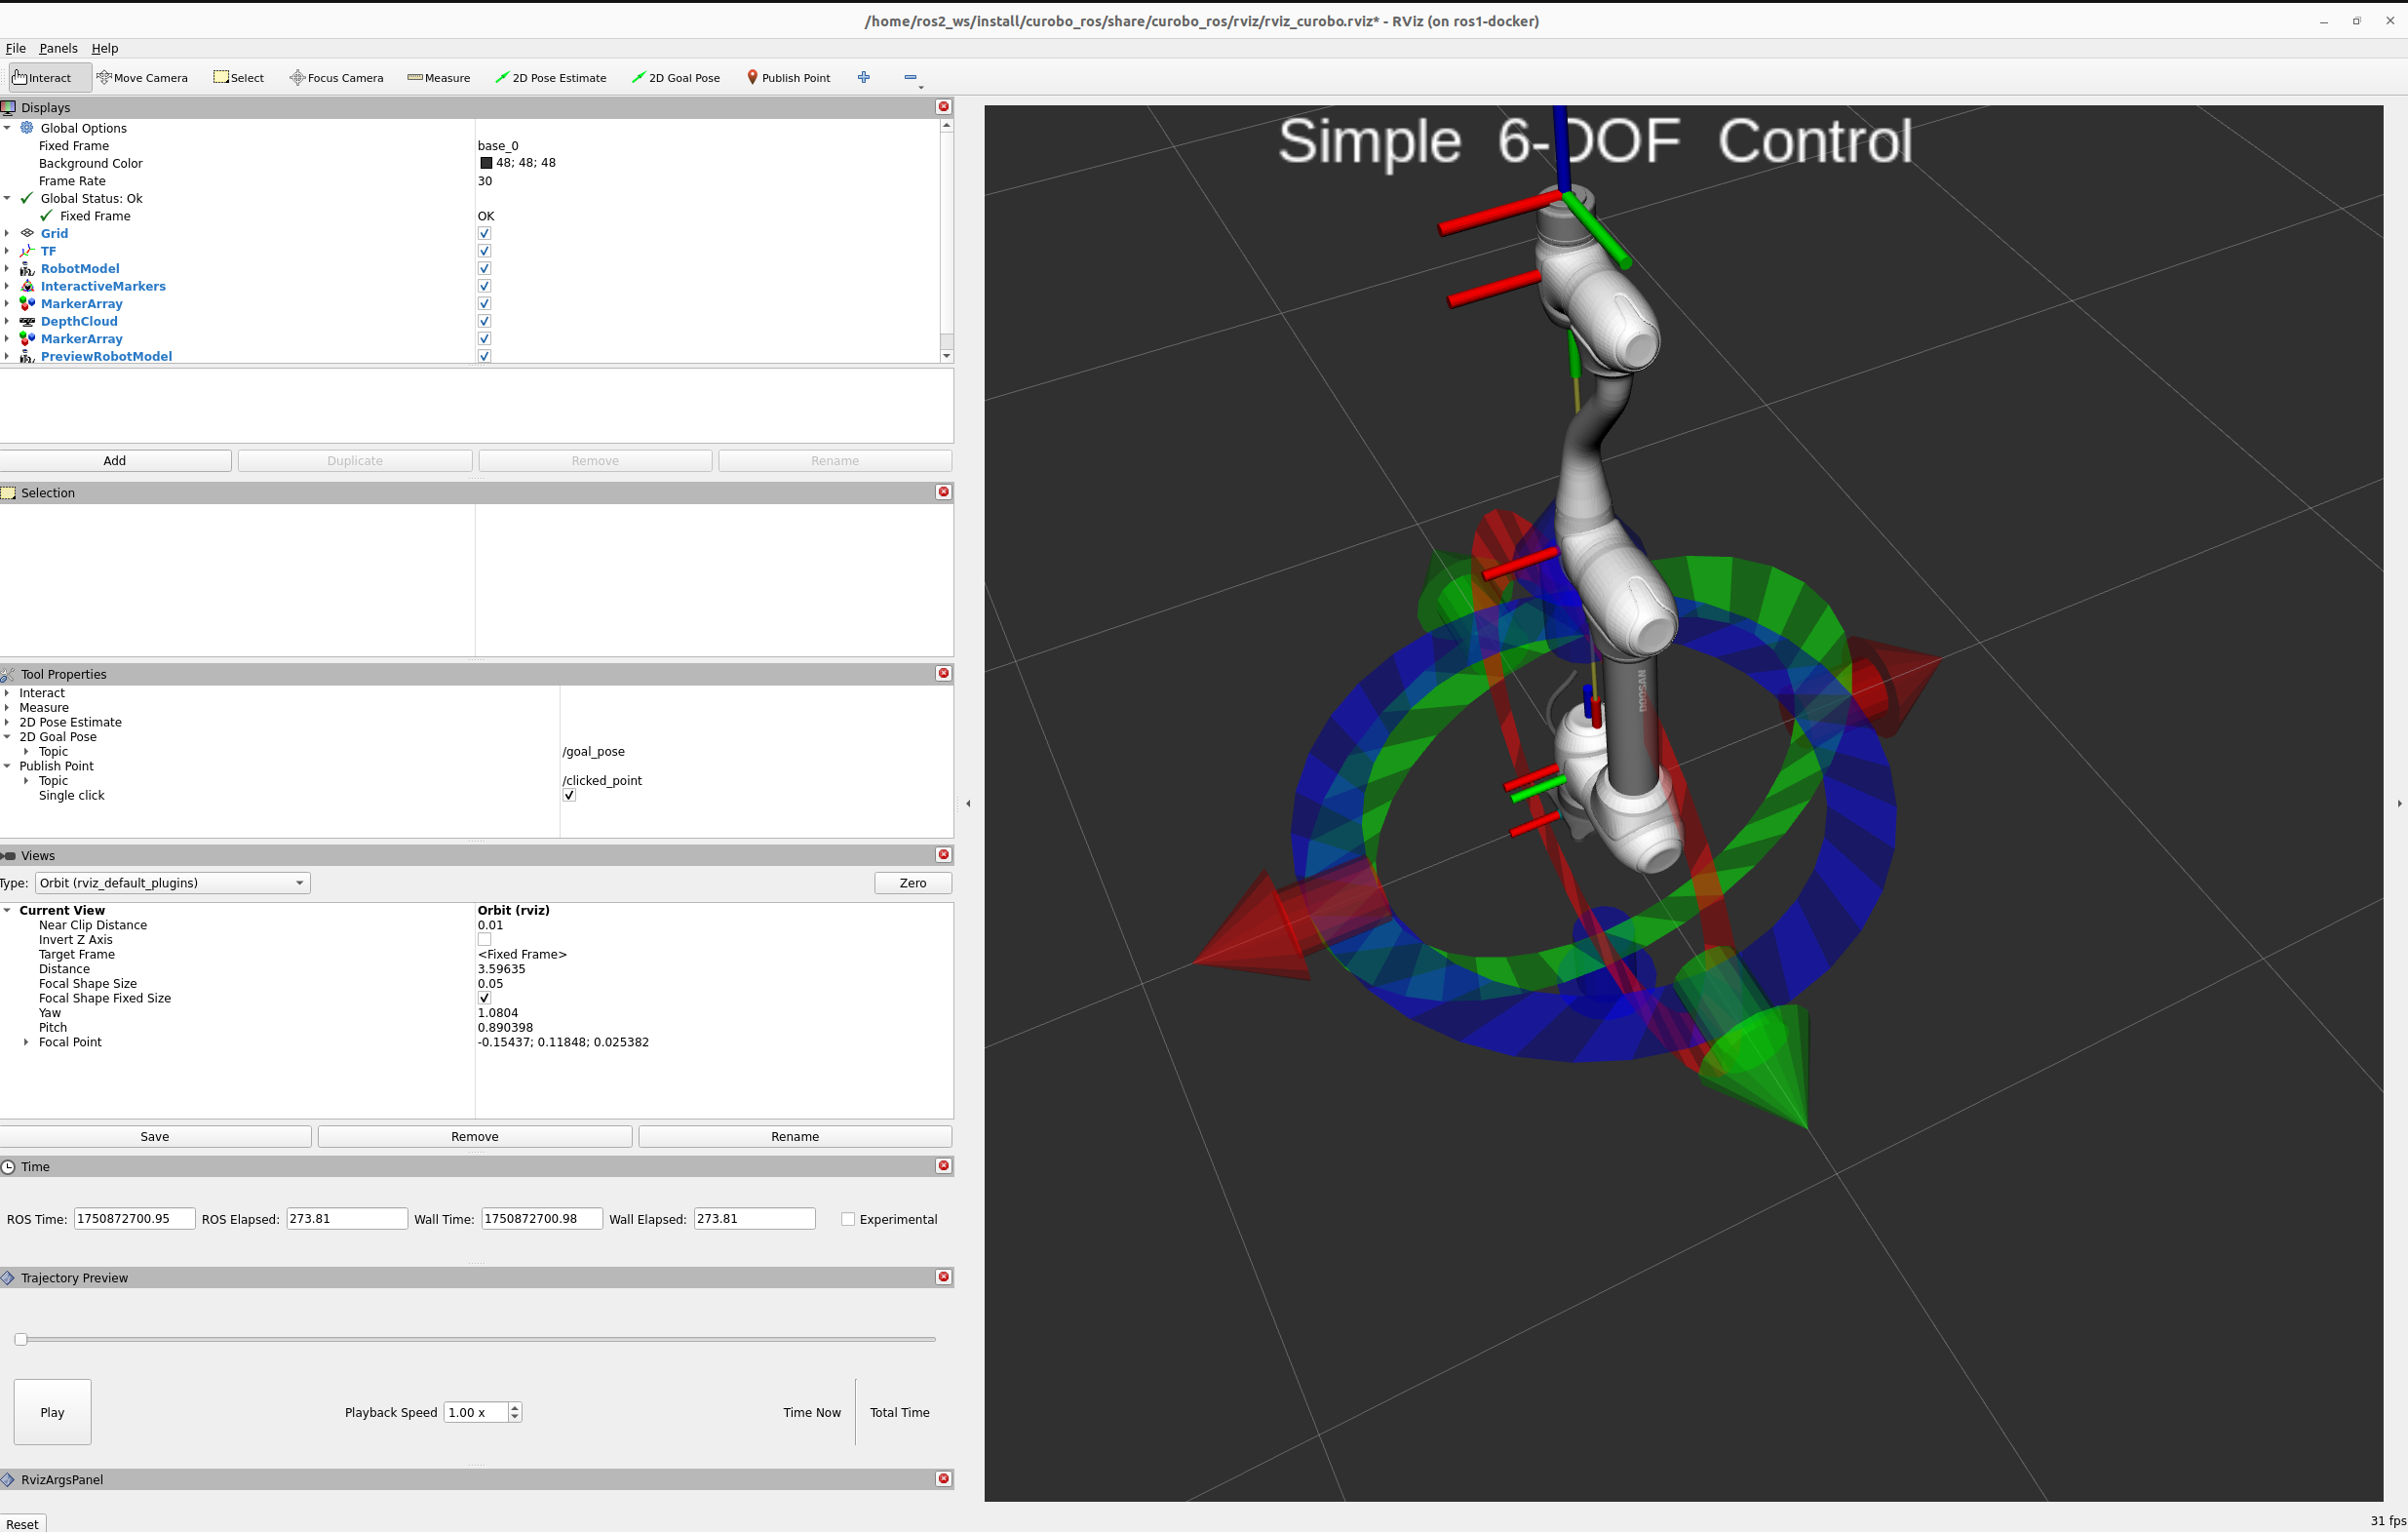
Tip: The default layout may appear cluttered. Rearrange panels for better usability (see recommended layout below).
Recommended Layout
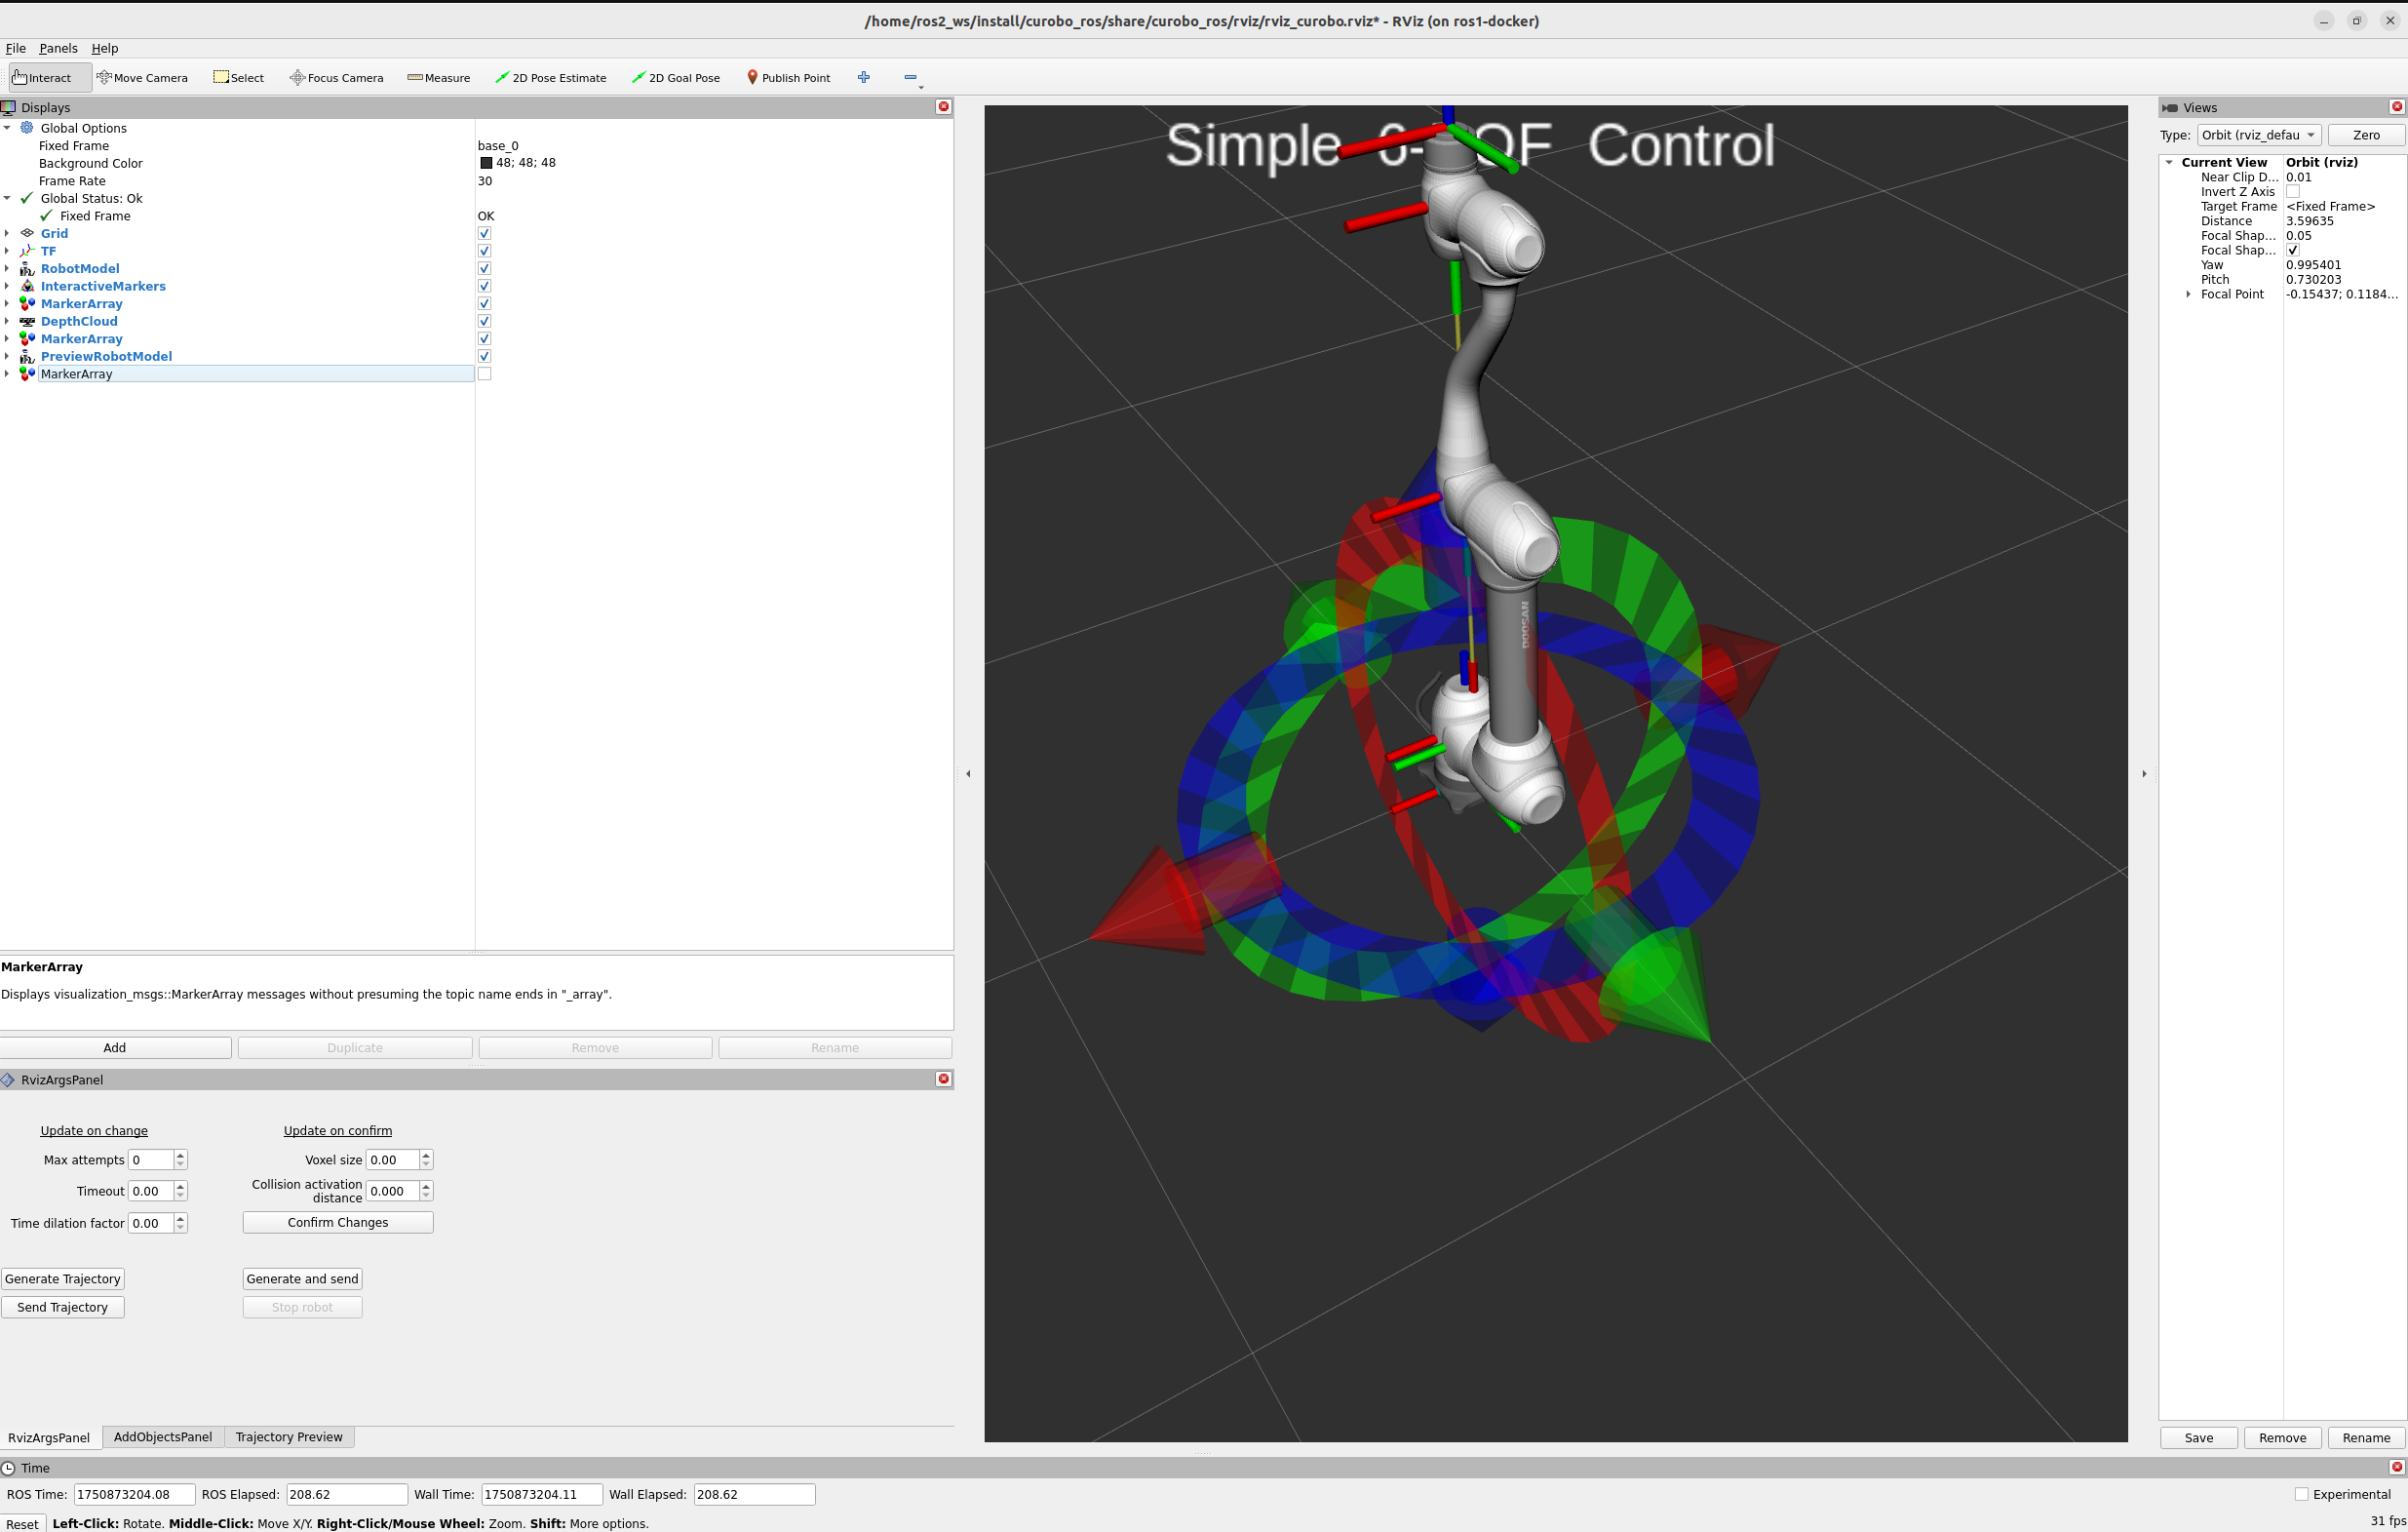
Recommended Panel Arrangement:
Left: Control Panel + Object Manager
Center: 3D Visualization (largest area)
Bottom: Trajectory Visualization Timeline
Interface Components
1. 🧭 Control Panel
The Control Panel is the main interface for planning and executing robot motions.

Features
Interactive Marker Control:
6-DOF Marker: Position and orient the target pose in 3D space
Real-time Updates: Marker position updates as you drag
Snap to Grid (optional): Enable for precise positioning
Planning Controls:
Generate Trajectory button: Plan path from current pose to marker pose
Execute Trajectory button: Send planned trajectory to robot
Cancel Execution button: Stop robot mid-motion (if supported)
Clear Trajectory button: Remove current trajectory from visualization
Parameter Sliders:
Time Dilation Factor (0.3-1.0): Adjust robot speed
Collision Activation Distance (0.01-0.1 m): Safety margin
Max Attempts (1-10): Planning retries on failure
Timeout (0.5-30.0 s): Maximum planning time
Using the Interactive Marker
Moving the Marker:
Translation: Click and drag the arrow handles (X: red, Y: green, Z: blue)
Rotation: Click and drag the ring handles around each axis
Combined Motion: Hold Shift while dragging for simultaneous translation + rotation
Tips:
Use the mouse scroll wheel to zoom in/out for precision
Right-click and drag to rotate the camera view
Middle-click and drag to pan the camera
Example Workflow:
1. Move interactive marker to desired goal pose
2. Click "Generate Trajectory" button
3. Wait for trajectory visualization to appear
4. Inspect trajectory in timeline (see Trajectory Visualization section)
5. Click "Execute Trajectory" to send to robot
6. Monitor execution in real-time
Parameter Tuning from Panel
Time Dilation Factor:
Slider range: 0.3 (slow) to 1.0 (fast)
Changes take effect on next trajectory generation
Use lower values (0.3-0.5) for testing
Use higher values (0.7-1.0) for production
Collision Activation Distance:
Slider range: 0.01 m (tight) to 0.1 m (conservative)
Changes require regenerating trajectory
Smaller values allow tighter paths
Larger values increase safety margin
Max Attempts:
Slider range: 1 (single try) to 10 (persistent)
Affects planning success rate vs. latency
Increase for difficult planning problems
Keep at 1 for real-time responsiveness
2. 📈 Trajectory Visualization
This panel provides a timeline-based visualization of the generated trajectory.
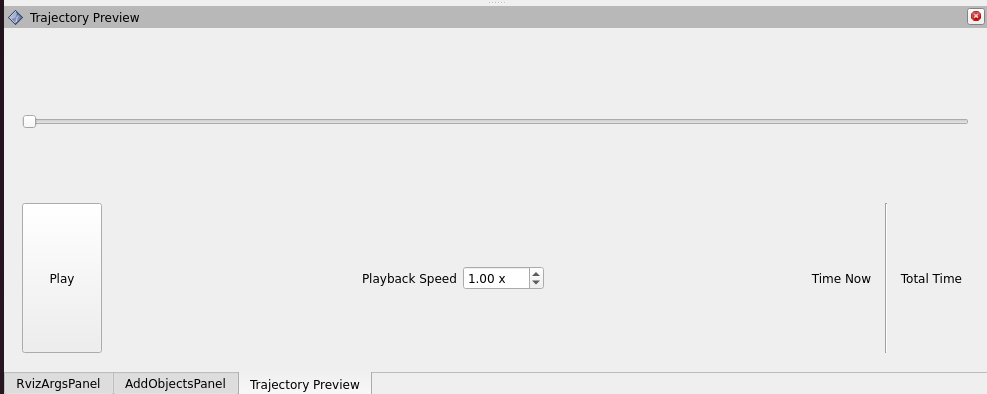
Features
Timeline Display:
Horizontal axis: Time (seconds)
Playback controls: Play, pause, stop, scrub timeline
Speed control: Adjust playback speed (0.1x to 5.0x)
Loop option: Repeat trajectory animation
Ghost Robot:
Translucent robot model: Shows predicted motion
Color-coded velocity: Red (fast) → Yellow (medium) → Green (slow)
Joint configuration: Visualize joint angles throughout trajectory
Collision spheres: Optional display of robot collision geometry
Joint Plots:
Position traces: One line per joint
Velocity traces: Joint velocities over time
Acceleration traces: Joint accelerations (if enabled)
Limits display: Show joint position/velocity limits as red lines
Using Trajectory Visualization
Inspecting Trajectories:
1. After generating trajectory, timeline appears with waypoints
2. Click "Play" to animate ghost robot along path
3. Drag timeline scrubber to inspect specific points
4. Check velocity plot for smoothness (should be continuous)
5. Verify robot doesn't collide with obstacles
6. Check joint plots for constraint violations
Common Inspection Points:
Start/end poses: Verify correct initial and final configurations
Mid-trajectory: Check for unexpected joint flips or singularities
Near obstacles: Ensure sufficient clearance
Velocity peaks: Identify fast/aggressive motion segments
Acceleration spikes: May indicate non-smooth trajectory
Playback Controls:
Play/Pause: Spacebar or play button
Scrub: Click and drag timeline scrubber
Speed: Use +/- buttons or slider (0.1x to 5.0x)
Loop: Enable to continuously replay trajectory
Frame-by-frame: Use arrow keys for precise inspection
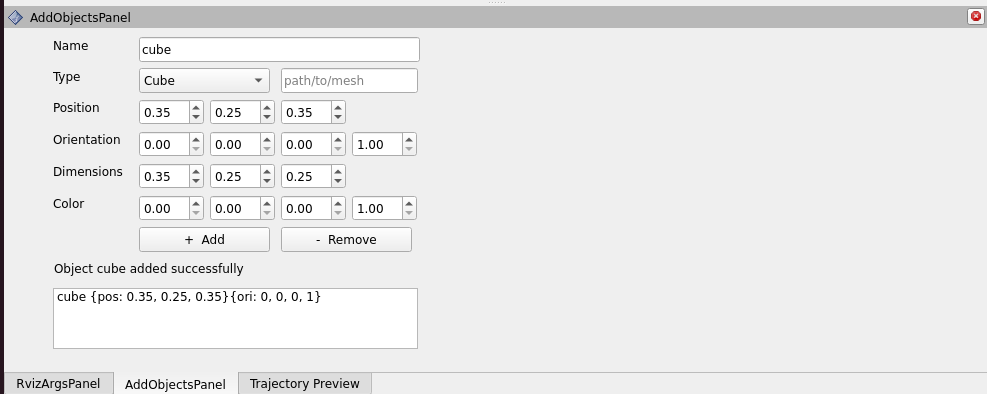
3. 📦 Object Manager
The Object Manager allows you to add and remove collision obstacles in the robot’s environment.
Supported Object Types
Type |
Primitive ID |
Parameters |
Use Case |
|---|---|---|---|
Cuboid |
0 |
Dimensions [length, width, height] |
Tables, walls, boxes |
Sphere |
1 |
Radius |
Balls, rounded obstacles |
Cylinder |
2 |
Radius, height |
Columns, pipes, cans |
Capsule |
3 |
Radius, height |
Rounded cylinders |
Mesh |
4 |
Mesh file path (.stl, .obj) |
Complex geometries |
Adding Objects via Object Manager
Step-by-Step:
Select object type from dropdown (Cuboid, Sphere, Cylinder, Capsule, Mesh)
Enter object name (must be unique)
Set dimensions (depends on object type):
Cuboid: Length, Width, Height (meters)
Sphere: Radius (meters)
Cylinder: Radius, Height (meters)
Capsule: Radius, Height (meters)
Mesh: Browse for file path
Set pose (position + orientation):
Position: X, Y, Z (meters, relative to robot base)
Orientation: Quaternion (x, y, z, w) or Euler angles
Click “Add Object” button
Example Values:
Table:
  Type: Cuboid
  Name: "table"
  Dimensions: [1.2, 0.8, 0.05]
  Position: [0.6, 0.0, 0.0]
  Orientation: [0, 0, 0, 1]

Wall:
  Type: Cuboid
  Name: "wall"
  Dimensions: [0.1, 2.0, 2.0]
  Position: [-0.5, 0.0, 1.0]
  Orientation: [0, 0, 0, 1]

Cylinder:
  Type: Cylinder
  Name: "pole"
  Radius: 0.05
  Height: 1.5
  Position: [0.5, 0.5, 0.75]
  Orientation: [0, 0, 0, 1]
Removing Objects
Single Object:
Select object from list in Object Manager
Click “Remove Object” button
Object is removed from collision checking
All Objects:
Click “Remove All Objects” button
Clears entire obstacle list
Via Command Line (Alternative):
# Remove specific object
ros2 service call /unified_planner/remove_object curobo_msgs/srv/RemoveObject \
  "{name: 'table'}"

# Remove all objects
ros2 service call /unified_planner/remove_all_objects std_srvs/srv/Trigger
Mesh Object Handling
Important: Mesh objects are voxelized into cuboids for collision checking (see Parameters Guide - Collision Cache).
Before adding meshes:
# Increase OBB cache for mesh cuboids
ros2 service call /unified_planner/set_collision_cache \
  curobo_msgs/srv/SetCollisionCache "{obb: 300, mesh: -1, blox: -1}"

ros2 service call /unified_planner/update_motion_gen_config std_srvs/srv/Trigger
Adding mesh via Object Manager:
Select “Mesh” from type dropdown
Enter mesh name
Browse and select mesh file (.stl or .obj format)
Set pose (position + orientation)
Click “Add Object”
Mesh is automatically voxelized into cuboids
Visualization Limitation:
Objects added via Object Manager are not currently visualized in RViz 3D view
This feature is under development
Objects DO affect collision checking and trajectory planning
Verify objects added by checking obstacle list or testing trajectory planning
4. 🎨 RViz 3D Visualization
The main 3D viewport displays:
Robot Model:
Actual robot: Current robot state (from /joint_states topic)
Ghost robot: Predicted trajectory visualization (translucent)
Collision spheres: Optional display of robot collision geometry
Interactive Marker:
6-DOF marker: Target pose for trajectory planning
Color-coded handles: X (red), Y (green), Z (blue)
Rotation rings: Orientation control
Coordinate Frames:
Base frame: Robot base coordinate frame
End-effector frame: Tool center point (TCP)
World frame: Global reference frame
Visualization Options:
Grid: Enable/disable ground plane grid
Axes: Show/hide coordinate frame axes
Collision Spheres: Toggle robot collision geometry
Background: Change background color (light/dark)
Camera Controls
Mouse Navigation:
Rotate: Left-click and drag
Pan: Middle-click and drag (or Shift + left-click)
Zoom: Scroll wheel (or Right-click and drag up/down)
View Presets:
Top View: Look down on robot from above
Front View: Look at robot from front
Side View: Look at robot from side
Isometric: 45° angled view (recommended)
Tips:
Press ‘F’ to focus camera on robot
Press ‘R’ to reset view to default
Use orthographic projection for precise measurements
Common Workflows
Workflow 1: Plan and Execute Simple Motion
1. Launch RViz plugin:
   ros2 launch curobo_ros gen_traj.launch.py

2. Wait for warmup to complete (~10-20 seconds)

3. Move interactive marker to desired goal pose:
   - Drag translation arrows to move
   - Drag rotation rings to orient

4. Click "Generate Trajectory" button

5. Wait for trajectory to appear in timeline (~1-3 seconds)

6. Inspect trajectory:
   - Play animation to verify motion
   - Check velocity plot for smoothness
   - Ensure no collision with obstacles

7. Click "Execute Trajectory" button to send to robot

8. Monitor execution in real-time
Workflow 2: Plan with Obstacles
1. Launch RViz plugin

2. Add obstacles via Object Manager:
   - Select "Cuboid" type
   - Name: "table"
   - Dimensions: [1.2, 0.8, 0.05]
   - Position: [0.6, 0.0, 0.0]
   - Click "Add Object"

3. Move interactive marker to goal (potentially behind obstacle)

4. Click "Generate Trajectory"

5. Trajectory automatically avoids obstacle

6. Inspect clearance in trajectory animation

7. Execute if clearance is acceptable
Workflow 3: Tuning Parameters for Better Performance
1. Generate initial trajectory (baseline)

2. If too slow:
   - Increase Time Dilation Factor slider (0.7-1.0)
   - Regenerate trajectory
   - Compare execution time

3. If planning fails:
   - Increase Max Attempts slider (3-5)
   - Increase Timeout slider (10-15 seconds)
   - Regenerate trajectory

4. If colliding with obstacles:
   - Increase Collision Activation Distance (0.03-0.05 m)
   - Regenerate trajectory

5. If path too conservative:
   - Decrease Collision Activation Distance (0.01-0.02 m)
   - Regenerate trajectory
Troubleshooting
Issue 1: RViz Freezes at Startup
Symptoms: RViz window opens but is unresponsive, robot model doesn’t appear
Causes:
cuRobo warmup phase (normal, wait 10-30 seconds)
GPU initialization taking longer than expected
Out of GPU memory
Solutions:
# Check if node is running
ros2 node list | grep unified_planner

# Check for errors in terminal
# Look for CUDA errors or GPU memory issues

# If out of GPU memory, try reducing voxel_size
ros2 launch curobo_ros gen_traj.launch.py voxel_size:=0.08
Issue 2: Interactive Marker Not Responding
Symptoms: Cannot move interactive marker, handles don’t appear
Causes:
Interactive marker not published yet (warmup incomplete)
RViz interactive marker plugin disabled
Marker hidden or out of view
Solutions:
# Check if marker is published
ros2 topic list | grep interactive_marker

# Verify marker topic exists
ros2 topic echo /unified_planner/interactive_marker/update --once

# In RViz: Displays -> Interactive Markers -> Update Topic
# Ensure topic is set to /unified_planner/interactive_marker/update
Issue 3: Trajectory Generation Fails
Symptoms: Click “Generate Trajectory” but nothing happens, error message appears
Causes:
Goal pose unreachable (outside workspace or violates joint limits)
Collision with obstacles blocking path
Timeout exceeded
Solutions:
# Test if goal is reachable using IK (warmup first if not done)
ros2 service call /unified_planner/warmup_ik curobo_msgs/srv/WarmupIK "{batch_size: 1}"
ros2 service call /unified_planner/ik curobo_msgs/srv/Ik \
  "{pose: {position: {x: 0.5, y: 0.3, z: 0.4}, orientation: {w: 1.0}}}"

# If IK fails, adjust marker pose closer to robot

# Increase timeout in Control Panel (slider)

# Increase Max Attempts in Control Panel (slider)

# Check terminal for detailed error messages
Issue 4: Added Objects Not Affecting Planning
Symptoms: Added objects via Object Manager but trajectory goes through them
Causes:
Object visualization not updated (this is known limitation)
Object cache exceeded
Object pose incorrect
Solutions:
# Verify object was added
ros2 service call /unified_planner/get_obstacles std_srvs/srv/Trigger

# Check collision cache
ros2 param get /unified_planner collision_cache

# Increase cache if needed
ros2 service call /unified_planner/set_collision_cache \
  curobo_msgs/srv/SetCollisionCache "{obb: 300, mesh: -1, blox: -1}"

ros2 service call /unified_planner/update_motion_gen_config std_srvs/srv/Trigger

# Regenerate trajectory
Issue 5: Trajectory Visualization Not Appearing
Symptoms: Trajectory generates successfully but timeline/ghost robot doesn’t appear
Causes:
Trajectory preview panel not enabled
Topic connection issue
RViz panel configuration incorrect
Solutions:
# Check if trajectory topic is published
ros2 topic list | grep trajectory

ros2 topic echo /unified_planner/trajectory --once

# In RViz: Panels -> Add New Panel -> Trajectory Preview
# Ensure topic is set to /unified_planner/trajectory
Tips and Best Practices
Planning Tips
Start with Simple Motions: Test with nearby goals before attempting complex motions
Check Reachability First: Use IK service to verify goal is reachable before planning
Inspect Before Executing: Always review trajectory animation before executing on real robot
Use Conservative Parameters: Start with slow speeds (time_dilation_factor=0.3) for testing
Add Obstacles Gradually: Add one obstacle at a time to ensure collision avoidance works
Visualization Tips
Adjust Camera Angle: Use isometric view (45° angle) for best spatial awareness
Enable Grid: Helps visualize robot position relative to ground plane
Use Loop Playback: Enable loop to continuously review trajectory
Slow Playback: Use 0.5x or 0.25x speed for detailed inspection
Check Multiple Views: Inspect trajectory from multiple camera angles
Object Management Tips
Increase Cache First: Before adding meshes, increase OBB cache (see Collision Cache)
Use Simple Shapes: Prefer cuboids/cylinders over meshes when possible (faster)
Descriptive Names: Use clear names for objects (e.g., “table_left”, “wall_back”)
Remove Unused Objects: Clear obstacles when not needed to free GPU memory
Verify Addition: Always check obstacle list after adding objects
Performance Tips
Close Unused Panels: Hide panels you’re not using to improve responsiveness
Reduce Display Rate: Lower RViz update rate if visualization is laggy (Edit → Preferences)
Disable Unnecessary Displays: Turn off collision spheres, axes, or other displays when not needed
Use Larger Voxels: Increase voxel_size (0.08-0.1 m) for faster planning with simple obstacles
Keyboard Shortcuts
Shortcut |
Action |
|---|---|
Spacebar |
Play/pause trajectory animation |
Left/Right Arrow |
Step forward/backward in trajectory timeline |
+/- |
Increase/decrease playback speed |
R |
Reset camera view |
F |
Focus camera on robot |
G |
Toggle grid display |
Esc |
Deselect interactive marker |
Known Limitations
Object Visualization: Objects added via Object Manager are not visualized in RViz (under development)
Mesh Preview: Mesh objects show as cuboids in collision checking, not original mesh
Real-time Modification: Cannot modify objects after adding (must remove and re-add)
Undo/Redo: No undo functionality for object addition or trajectory generation
Configuration Persistence: RViz layout and parameter values don’t persist across sessions
These limitations are actively being addressed in future releases.